Astrophotography is a captivating pursuit that blends technical expertise with artistic vision. At the heart of this discipline lies the exposure triangle: ISO, aperture, and exposure time. These three elements work together to control the amount of light your camera captures, making them fundamental for creating striking images of the night sky, be it galaxies, nebulae or milky way landscape photography. For astrophotographers using DSLR cameras, understanding and mastering the exposure triangle is essential. Let’s delve into these factors and how they interact, especially in relation to fast and slow f-ratio instruments.
The Exposure Triangle Explained
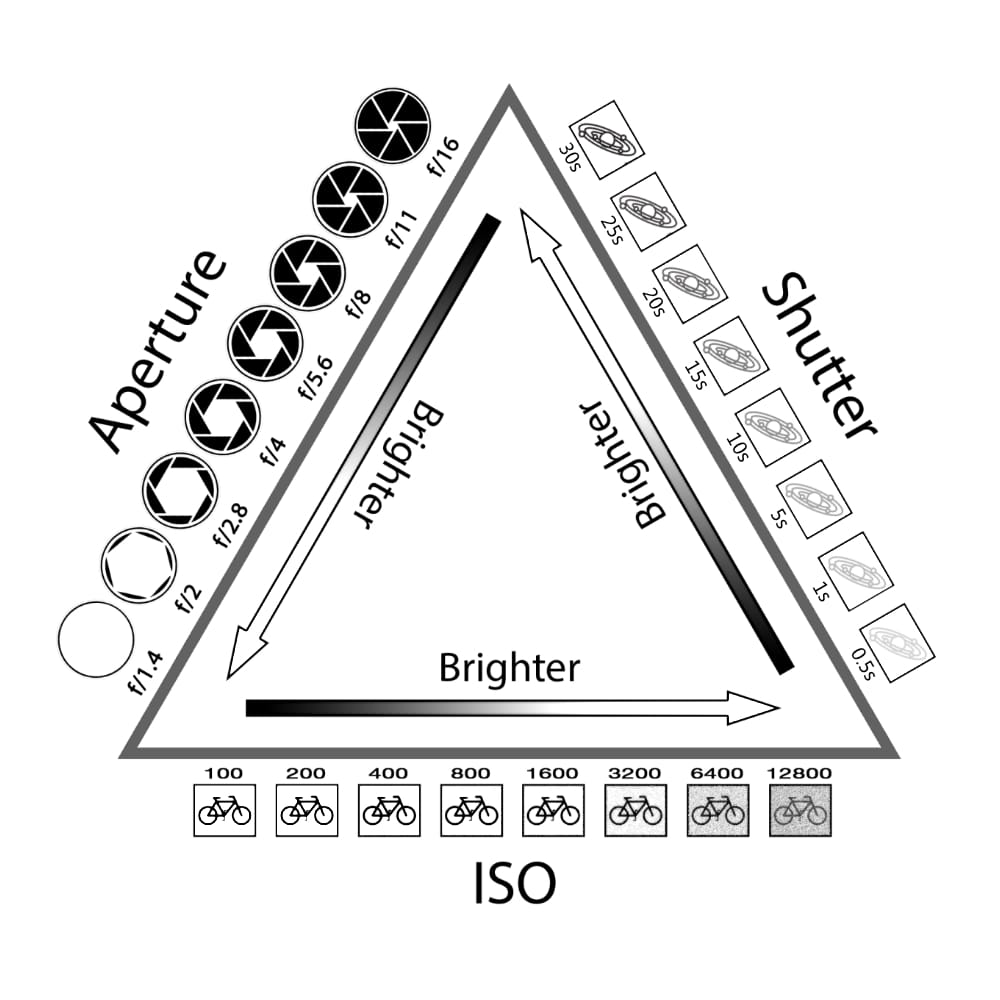
The exposure triangle represents the relationship between ISO, aperture, and exposure time—three settings that determine the brightness and detail of an image. While these settings apply to all types of photography, they take on unique importance in astrophotography due to the faintness of celestial targets and the constraints of night-time imaging.
ISO: Light Sensitivity
ISO defines your camera sensor’s sensitivity to light. A higher ISO setting amplifies the signal, allowing the camera to detect faint details. However, increasing ISO also amplifies noise, which can reduce the clarity of your image. For deep-sky imaging:
- Start with a moderate ISO, such as 800 or 1600, to balance sensitivity and noise.
- Modern DSLRs and mirrorless cameras often perform well at higher ISOs due to improved noise reduction algorithms.
- Experiment with your specific camera model to find its optimal ISO range for astrophotography.
Aperture: The Light Gateway
Aperture refers to the size of the opening in your lens or telescope that allows light to enter. It is typically expressed as an f-ratio (e.g., f/2.8 or f/10). The f-ratio is calculated by dividing the focal length by the diameter of the aperture:
- Fast instruments (e.g., f/2.8): Have larger apertures relative to their focal length, enabling more light to reach the sensor. These are ideal for capturing faint deep-sky objects quickly. These are most telescopes and camera lenses
- Slow instruments (e.g., f/10): Allow less light per unit time but provide a narrower field of view and often greater magnification, which can benefit planetary or lunar imaging. Slow instruments are usually long focal length reflector telescopes
In astrophotography, the aperture influences both exposure and field depth. A wider aperture (lower f-ratio) enables shorter exposure times but can introduce challenges like field curvature or increased optical aberrations. Balancing these trade-offs is key to achieving sharp, well-lit images.
Exposure Time: Capturing the Moment
Exposure time determines how long the camera sensor collects light. For deep-sky imaging, longer exposures are often required to reveal faint details. However, several factors influence the maximum usable exposure:
- Earth’s Rotation: Without an equatorial mount or tracking system, stars will streak in your image due to Earth’s rotation. Exposure times should be limited to a few seconds in this case.
- Light Pollution: In urban areas, excessive exposure can saturate your image with unwanted brightness. Use filters or shorter exposures to mitigate this.
- Tracking Accuracy: For long exposures, precise polar alignment and tracking are crucial. Any tracking errors will blur your stars, regardless of the exposure duration.
Balancing the Triangle for Astrophotography
Achieving the right balance between ISO, aperture, and exposure time requires practice and experimentation. Let’s consider how these elements interact and some tips for optimising your settings:
ISO and Noise Control
While higher ISOs reveal fainter details, they also increase noise, which can overwhelm your image. The solution lies in capturing multiple shorter exposures at optimal ISO settings and stacking them during post-processing. Stacking software averages out noise while retaining signal, resulting in cleaner images.
Aperture and Depth of Field
Fast f-ratio instruments (e.g., f/2.8) are excellent for capturing expansive nebulae or star fields quickly. However, they may exhibit vignetting or coma at the edges of the frame. Slower systems (e.g., f/8 or f/10) produce sharper stars across the field but require longer exposures. Use a field flattener or coma corrector to improve image quality when working with fast optics.
Exposure Time and Star Trails
For beginners without tracking equipment, the 500-rule is a helpful guideline:
Maximum exposure (seconds) = 500/(focal length (mm) x crop factor)

This rule minimises star trails by limiting exposure time based on your focal length. For advanced setups with tracking mounts, experiment with longer exposures to capture fainter details while ensuring your tracking remains precise.
Linking the Triangle to F-Ratio
The f-ratio of your lens or telescope directly affects how ISO, aperture, and exposure time work together. Consider these scenarios:
- Fast Optics (Low F-Ratio):
- Capture more light in less time, allowing lower ISO settings.
- Ideal for wide-field imaging and fast data acquisition.
- Challenges: May require additional corrections for field curvature or chromatic aberration.
- Slow Optics (High F-Ratio):
- Require higher ISO or longer exposures to compensate for reduced light throughput.
- Provide greater magnification and are better suited for isolating smaller targets.
- Challenges: Increased exposure times demand excellent tracking and stability.
Practical Tips for Beginners
- Invest in a Sturdy Mount: A good equatorial mount or star tracker significantly enhances your ability to take longer exposures, even with a basic DSLR setup.
- Calibrate Your Camera: Take dark, flat, and bias frames to improve your final image by reducing noise and correcting sensor imperfections.
- Use a Remote Shutter or Intervalometer: This prevents camera shake during exposures and allows for precise timing of multiple shots.
- Plan Your Session: Use tools like planetarium apps to locate targets and determine optimal imaging times based on weather and moon phases.
Final Thoughts
Understanding the interplay between ISO, aperture, and exposure time is fundamental to mastering deep-sky astrophotography. By practising with the exposure triangle and tailoring your approach to your equipment’s f-ratio, you can capture stunning images of the cosmos. Whether you’re using a fast f/2.8 lens to photograph expansive nebulae or a slower f/10 telescope to zero in on galaxies, the principles remain the same: balance light sensitivity, aperture, and exposure to reveal the universe’s hidden beauty.
