Stargazing can be a magical experience, but a little preparation goes a long way towards making your night under the stars as enjoyable as possible. Whether you’re heading out with just your eyes, a pair of binoculars, or a full telescope setup, having the right tools and knowing what to expect can significantly enhance your experience. In this guide, we’ll cover the essential apps, weather considerations, and star charts to help you plan the perfect stargazing session.
Checking the Weather: Clear Skies Are Essential
Before heading out, the first thing to check is the weather forecast. Cloud cover, humidity, and atmospheric stability all play a role in how well you’ll be able to see celestial objects.
- Cloud Cover: Even thin clouds can obscure faint objects. Use weather apps such as Clear Outside, Astrospheric, or MeteoBlue, which offer astronomy-specific forecasts.
- Seeing Conditions: The steadiness of the atmosphere affects how sharp celestial objects appear. A night with poor seeing conditions may make planets look wobbly and stars appear to twinkle excessively.
- Transparency: High humidity, dust, or pollution can reduce the contrast of deep-sky objects. Websites like Ventusky or Windy provide air quality and humidity forecasts.
A good rule of thumb is to aim for nights with low cloud cover, stable atmospheric conditions, and minimal light pollution.
Choosing the Right Location
Finding a dark-sky site away from city lights dramatically improves your stargazing experience. Light pollution washes out fainter objects, making deep-sky targets like nebulae and galaxies harder to see. Here’s how to find the best location:
- Dark Sky Maps: Websites such as Dark Site Finder or Light Pollution Map help you identify dark-sky locations near you.
- Local Astronomy Clubs: Many clubs have dedicated stargazing spots with minimal light pollution and accessible facilities.
- National Parks and Rural Areas: These are often great places to escape city lights and enjoy breathtaking views of the night sky.
Essential Tools: Apps, Star Charts, and Red Torches
To make the most of your stargazing session, you’ll need a few tools to help you navigate the night sky.
Astronomy Apps
Smartphone apps make it easy to identify stars, planets, and constellations. Some of the best options include:
- Stellarium: A fantastic planetarium app that allows you to see what’s visible in real-time.
- SkySafari: A more advanced app with extensive databases and telescope control options.
- Star Walk 2: A user-friendly app ideal for beginners, with an augmented reality feature.
- ISS Detector: Useful for spotting satellites and the International Space Station passing overhead.
Star Charts and Planispheres
While apps are convenient, a printed star chart or a planisphere is invaluable, especially if you’re in a location with poor mobile reception. These tools help you learn the sky manually and provide a deeper understanding of celestial movements.
Red Torch (Night Vision Preserver)
A standard flashlight can ruin your night vision, making it harder to see faint stars. Instead, use a red LED torch, which preserves your dark adaptation while allowing you to read charts or adjust your equipment.
Recommended Red Light Headlamp – EverBrite Head Torch £10.80
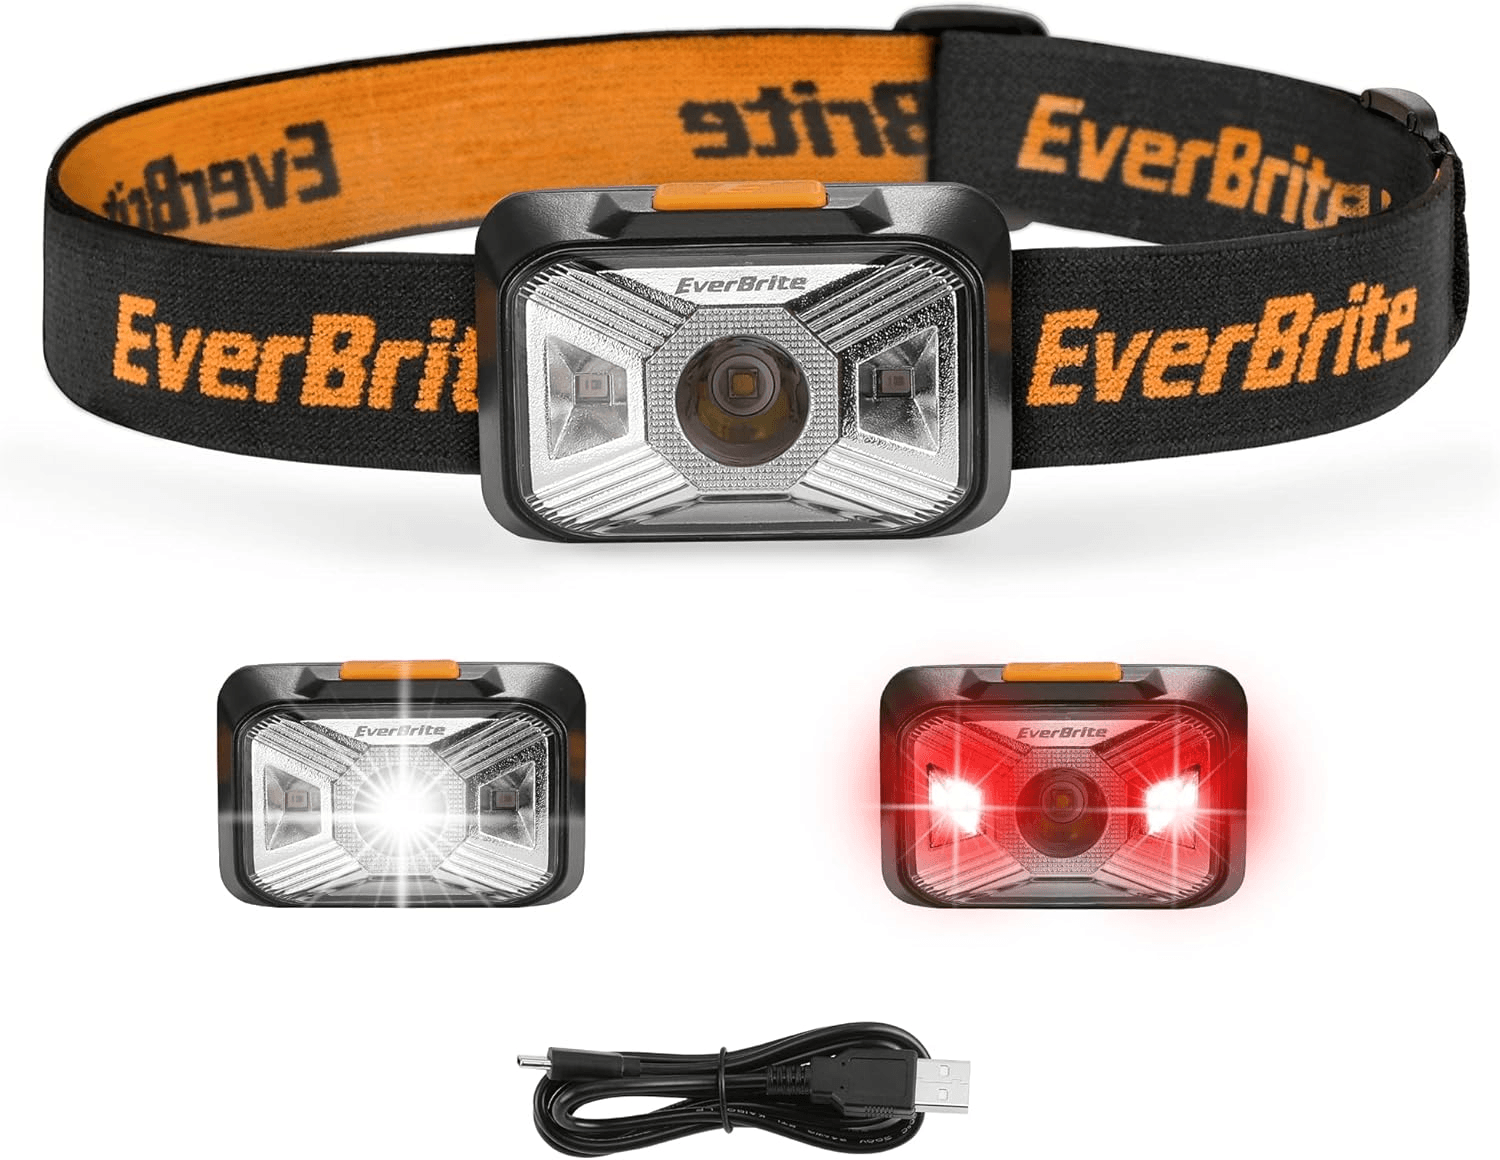
When setting up for a night of stargazing, a red light head torch is essential for maintaining night vision, and the EverBrite Rechargeable Head Torch is a fantastic option. As my go-to headlamp, its dedicated red light mode allows you to adjust settings, swap filters, and monitor equipment without ruining your dark adaptation.
With 200 lumens and four brightness modes, it provides just the right amount of light for navigating your setup while keeping glare minimal. The USB-C rechargeability means you don’t have to worry about batteries, and at just 70g, it’s comfortable and barely noticeable to wear.
What to Look For: Best Targets for Beginners
If you’re new to stargazing, start with easy-to-find objects before moving on to more challenging targets. Here are some excellent choices:
- The Moon: An easy and rewarding target, especially when it’s in its crescent or quarter phase.
- Planets: Jupiter and its moons, Saturn’s rings, and Mars are bright and easy to spot.
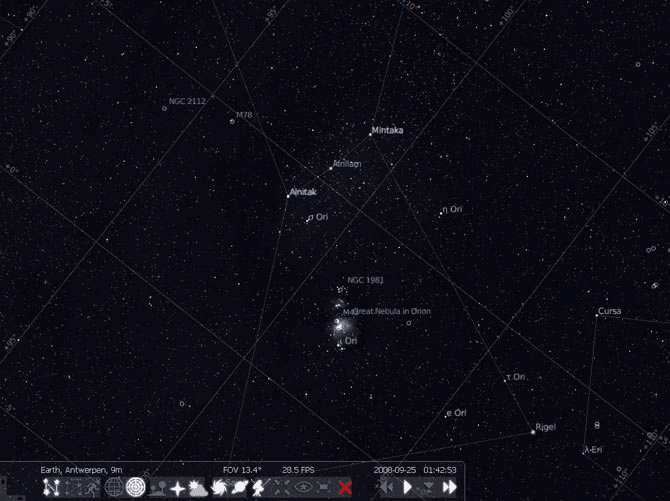
- The Orion Nebula (M42): A stunning deep-sky object visible even with binoculars.
- The Andromeda Galaxy (M31): The closest spiral galaxy to us and visible to the naked eye under dark skies.
- The Pleiades (M45): A beautiful open star cluster best viewed with binoculars.
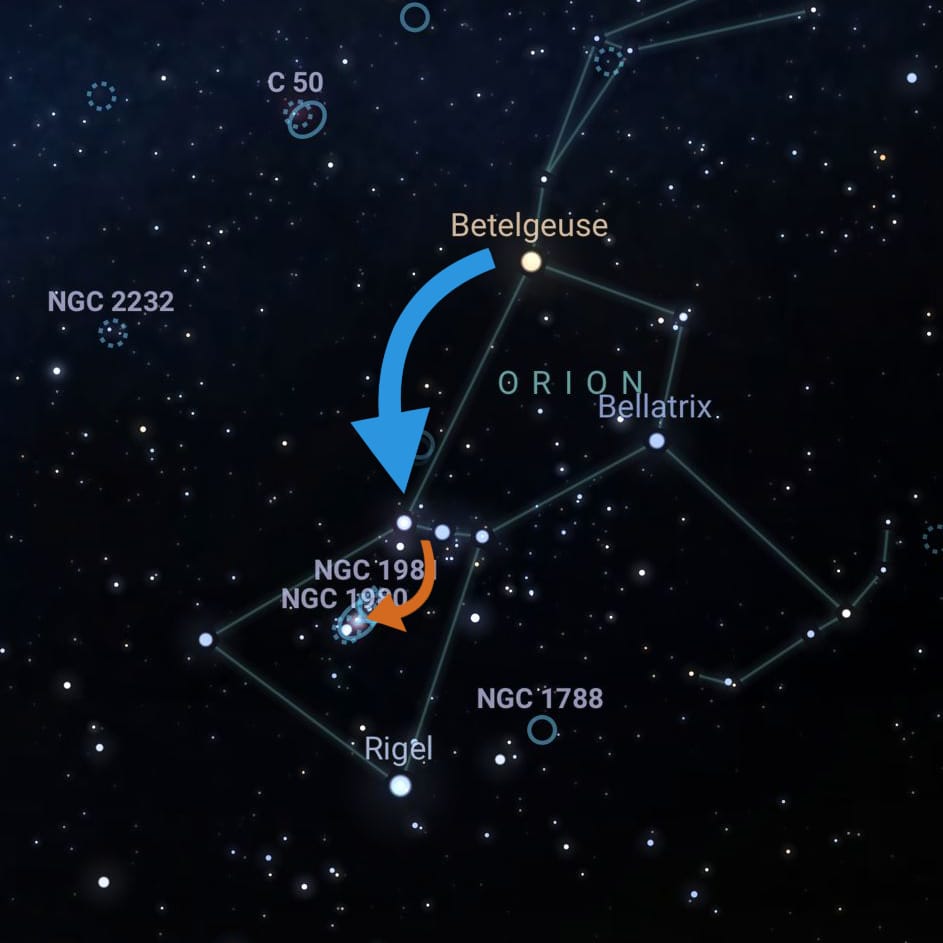
Using the search feature on your planetarium app these targets are easy to find using the “finder” mode of your planetarium app. The best way to find any target without a go-to mount is with star hopping
Star Hopping Quick Guide
For a full guide to how to efficiently star hop to your target, I’ve written this guide
A quick overview of star hopping:
- Choose a Bright Star: Start from a well-known, easily visible star near your target.
- Use a Star Chart or App: Plan your route using a star atlas, planetarium app, or printed charts.
- Identify Reference Stars: Find a pattern of stars that lead towards your deep-sky object using your naked eye first
- Move Incrementally: Use a low-power eyepiece or finderscope to slowly ‘hop’ from one star to the next.
- Check Your Progress: Compare what you see with your star chart to ensure you’re on track.
- Locate the Target: Once you reach the final reference point, switch to a higher magnification eyepiece for a better view.
Comfort and Safety Tips
Spending a few hours under the stars requires some preparation. Here’s how to stay comfortable and safe:
- Dress Warmly: Even in summer, night-time temperatures can drop significantly. Bring layered clothing to stay warm.
- Bring a Chair or Blanket: Sitting or lying down makes extended viewing sessions much more comfortable.
- Pack Snacks and Water: Staying hydrated and having a snack handy can keep you going through the night.
- Be Aware of Wildlife: If you’re in a remote area, be mindful of local wildlife and avoid wandering too far from your group or car.
Final Thoughts
A well-planned night of stargazing can be an unforgettable experience. By checking the weather, choosing a dark location, using the right tools, and knowing what to observe, you’ll set yourself up for success. Whether you’re casually enjoying the stars or diving deep into astrophotography, the night sky is full of wonders waiting to be explored. Happy stargazing!